SNES Hacking for Absolute Beginners
Graphics
Sprite Swapping:
Sprite swapping is exactly what it says on the tin. Below is a guide on how to switch out one set of graphics for another.
This is one of the most popular genres of hacks, and a simple starting point. To begin, download YY-CHR. I will also use ZMZ save states to show off palette loading.

This is the first item in SNES Ninja Gaiden 1, easy enough to reach. Let’s say we want to replace the Ninpo collectibles with Capcom’s Yashichi. To begin, I open Ninja Gaiden Trilogy in YY-CHR. By default it will use the 4BPP SNES/PCE format. Adjust the pattern until the sprites are in clearly-formatted rows (if you can’t find the sprites, they are most likely compressed) and you should have a screen that looks something like this.

To fix the palette, make a save state at the screen with this item. Press F12 within YY-CHR, load the Ninja Gaiden zst, and you will be able to select the correct palette.

The Ninpo pickup is 16X16 pixels. After making sure to fit it in a 16X16 image, I will import Final Fight 3’s Yashichi sprite by copying it to my clipboard, clicking the Ninpo icon, and pressing CTRL+V to overwrite it. If you use the default settings, your sprite may look miscoloured.

Fear not, this is perfectly normal. While recolouring can be done externally, for the purposes of this tutorial I will show how to do it within YY-CHR. The recolouring process is pretty simple, but please note the first colour in a palette set is the transparency colour. Here is a gif to demonstrate the process.

After using the available red and white/silver colours in the existing palette set, I came up with this. Not exact, but it gets the job done for our purposes.

Press F6 to save your ROM as a new file. Load your new ROM into an emulator. You’ll be able to see it worked.

Note that there are other potential tools to simplify the process such as SNESTilesKitten but this tutorial aims to teach hacking fundamentals which will help across different console environments.
Palette Swapping:
So the above trick can be used to swap colours, but it’s a bit limited. How does one introduce new colours to the mix then? If you have a hex editor (I use both HxD and WindHex32, but I’ll pick HxD here) it’s actually pretty simple. First, download SNES Color Tool to simplify the process of obtaining hex values.
For the game of choice, let’s try swapping Bomberman with Yellow Bomber in Super Bomberman 3. To obtain palette data, let’s load the game in MESEN-S and press CTRL+4 as soon as the first map begins. This will open the palette viewer.

This screen may seem intimidating at a glance, but remember there’s a trick to locating palette data which tends to work. Bomberman’s sprite is composed of red, blue, gray, white, and orange. Just from eyeballing, I can see an area in the middle which seems to lines up with his sprite. By comparing the hex values in a photo editor, I can determine the colours are exact matches as well. We only want to replace the white and light gray colours with the Yellow Bomber’s light and dark yellow parts, as well as switch the blue outfit for yellow.
As you can see in the gif above, the values are:
5294 (gray) 7FFF (white) 289D (red) 7560 (blue) 129F (orange)
or
52947FFF289D7560129F
Mark these down for later. Now let’s open SNES Color Tool. I want to generate hex code for a dark yellow, a bright yellow, and a medium yellow. These come out to 1F18, 03DF, and 07DE respectively.

Now to replace them. To locate Bomberman’s palette in the ROM, we’ll need to open Super Bomberman 3 in HxD and press CTRL+F. Earlier, I provided a value of “52947FFF289D7560129F” but that’s not quite right. Each colour value is 4 digits, and you will need to invert the first 2 digits with the last 2 digits to search through a hex editor. Therefore
5294 7FFF 289D 7560 129F
becomes
9452 FF7F 9D28 6075 9F12
Search for 9452FF7F9D2860759F12 in HxD using Hex-values, not Text-string. It should be spotted quickly.

Now let’s invert our yellow colours. 1F18 for dark yellow, 03DF for bright yellow, and 07DE for medium yellow. This means
1F18 03DF 07DE
becomes
181F DF03 DE07
Now let’s swap our colours. 9452 (gray) is replaced with 181F (dark yellow) first. FF7F (white) and DF03 (bright yellow) swap places next. 6075 (blue) is replaced by DE07 (medium yellow) last. Here is a before and after screenshot.

Save your ROM as a new file and boot up Super Bomberman 3. As you can see, it works.

As a warning, sometimes multiple objects in a ROM share the same palette data. For example, changing the game over blood from purple to red in Zombies Ate My Neighbors will also cause the purple monster to turn red which blends in with its hat. To get around this, a possible solution is giving the monster different colours in YY-CHR afterwards.

Note that there are other potential tools to simplify the process such as Super Palette Imager but this tutorial once again aims to teach hacking fundamentals which will help across different console environments.
Transparency:
Enabling or disabling transparency in SNES games is not so tricky, and can sometimes be used to great effect. However, this section will be brief since its utility is a bit more limited. I have opened Gundam Wing in MESEN-S and highlighted Epyon on the select screen. Unfortunately, one of the letters in its name is invisible since it’s normally never possible to select Epyon without a code.
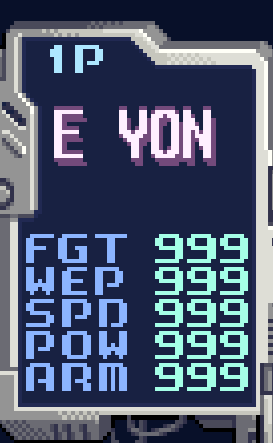
Is the letter even in the ROM? Well by pressing CTRL+1 we can open the tilemap and see that the P is indeed hidden in layer 3. Notice the different values.

E has values of 3D45 and 3D55. P has values of 1D60 and 1D70. Y has values of 3D69 and 3D79. Notice the odd one out? By switching the P’s values to 3D60 and 3D70 in the ROM, we can make the letter visible. Let’s find these tiles in the ROM by inverting the first 2 and last 2 digits.
The top part of the E is 3D45, which gets swapped to 453D when searching for hex values in HxD. The top part of P is 1D60, which becomes 601D. The top part of the Y is 3D69 which comes out to 693D.
After opening Gundam Wing: Endless Duel in HxD, I used the Hex-values (not Text-string) option to search for “453D601D693D” and immediately got a hit. I swapped the 1s for 3s and repeated the process for the bottom halves of the letters in Epyon’s name.

After saving the ROM, I tested the character select screen again and as expected, the name is fully visible.


